# Установка Сервера
## **Создание Сервера**
Basics of setting up the server application
---
### **Overview**
**Creating a Home Server is free, hosting one with a VPS is easier and more secure**
Servers are an integral part of BeamMP; players are connected to each other through the server. They run natively on Windows and Linux.
You can make private servers, which only people you invite can join, or public servers, which will show in our official server list.
Запуск сервера — это процесс из нескольких шагов! Если у вас возникнут какие-либо проблемы, смело задавайте их на нашем [форуме](https://forum.beammp.com) или на нашем [сервере Discord](https://discord.gg/beammp) в канале `#support`. Также обратитесь к разделу [«Обслуживание сервера»](server-maintenance.md) для получения дополнительной информации.
Перед использованием обязательно прочтите [ЛИЦЕНЗИЮ](https://raw.githubusercontent.com/BeamMP/BeamMP-Server/master/LICENSE) сервера.
Примечание: *сервер поддерживает только IPv4. Если вы не знаете, какой у вас IPv4, посмотрите на IP-адрес, который вы видите на [*whatsmyip.org*](https://www.whatsmyip.org/) — если он содержит* двоеточия `_:_` *, это **IPv6**. В этом случае вам следует дополнительно выяснить, есть ли у вас IPv4. Вы можете позвонить своему интернет-провайдеру, чтобы узнать это, или спросить кого-то, кто живет с вами (если они разбираются в технологиях, они могут знать!). Поддержка IPv6 планируется.*
## Настройка Сервера
The setup consists of the following steps, you should follow all of them.
### **1. Port forwarding**
!!! info
```
If you are on a VPS (Virtual Private Server), Rootserver, or plan on hosting this server locally (with players in the same house as you), you can skip this step.
This step is necessary if you want someone **outside** of your household to join your home-hosted server (outside of your local network).
!!! danger ":material-scale-balance: DISCLAIMER:"
**Port forwarding is a risk**.
By port forwarding, you understand the risks of opening up ports on your home network to the public and therefore void the right to hold BeamMP accountable for **any and all** damages that may happen to you or your household.
We take no responsibility for any content on any externally linked services or websites.
It is therefore recommended to host a server with one of our partnered services!
*Please see [this guide on how to port forward](port-forwarding.md)*
```
#### Partnered Hosting Services (paid):
- [Horizon Hosting](https://hrzn.link/beammp)
- [RackGenius](https://rackgeni.us/beammp-plans)
- [Connect Hosting](https://connecthosting.net/beammp)
- [Assetto Hosting](https://assettohosting.com/en/games/beamng)
- [ZAP-Хостинг](https://zap-hosting.com/itsbeammp)
- [HostHavoc](https://hosthavoc.com/)
- [PedalHost](https://pedal.host/)
- [Vyper Hosting](https://vyperhosting.com/r/beammp)
- [BisectHosting](https://www.bisecthosting.com/beammp-server-hosting)
- [Four Seasons Hosting](https://fourseasonshosting.com)
- [Vertuo Hosting](https://vertuohosting.com)
- [Winheberg](https://winheberg.fr/offres/gaming/beammp?lang=en)
- [Ваббанод](https://wabbanode.com/partner/beammp)
- [Айcлайн Хостинг](https://iceline-hosting.com/games/beammp)
#### 1.1 Firewall
Depending on your setup, you may need to let BeamMP-Server through your firewall. This is the case on Windows (turning the firewall off usually does **not** work), and on a lot of preinstalled Linux servers.
Там вы хотите разрешить BeamMP-Server через брандмауэр, **как входящие, так и исходящие соединения**, и **как TCP, так и UDP**. Если ваш брандмауэр запрашивает порт вместо этого, это должен быть тот же порт, который вы использовали на шаге «1. Переадресация портов» (обычно 30814).
For a more detailed guide, refer to [this documentation page](https://docs.beammp.com/FAQ/Defender-exclusions/). If you have issues, also feel free to ask on our [Forum](https://forum.beammp.com) or on our [Discord server](https://discord.gg/beammp) in the `#support` channel.
### **2. Obtaining an Authentication Key**
The “Authentication Key”, often called “AuthKey”, is necessary for making a **public** server accessible by the serverlist. Though it is recommended to add the authkey to private servers as well. You have a limited number of keys. One key can be used on one server at a time, so you cannot start two servers at the same time with the same key. More keys can be obtained by supporting the project. Read [this article](https://docs.beammp.com/support/player-faq/) for more information.
!!! warning
```
НИКОГДА НЕ ДЕЛИТЕСЬ ЭТИМ КЛЮЧОМ И НЕ ПОКАЗЫВАЙТЕ ЕГО НИКОМУ. ОТНОСИТЕСЬ К НЕМУ КАК К ПАРОЛЮ.
```
Для этого шага вам понадобится учетная запись [Discord](https://discord.com). Это необходимо для предотвращения спама.
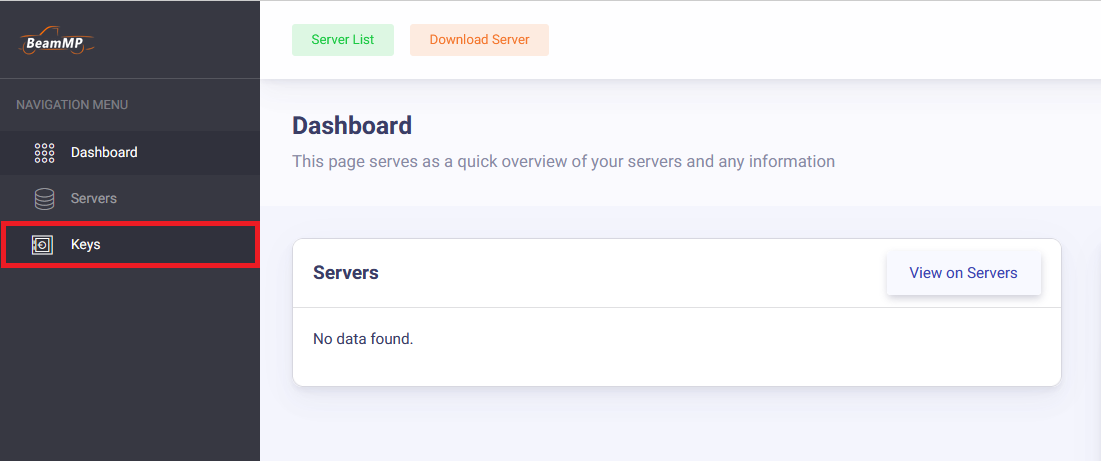
#### 2.1. Accessing the keys page
Login with Discord to the [Keymaster](https://beammp.com/keymaster). From the Keymaster homepage click on "Keys" on the left of the screen:
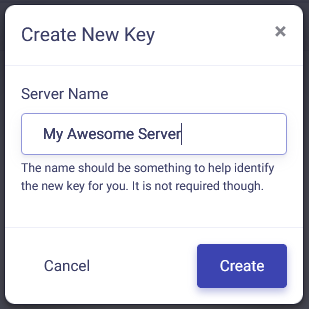
#### 2.2. Creating a key
To create your key, click on the green "+" button in the top right.

#### 2.3. Filling out the key information
Next, fill out the Server Name field (this is just the keys name and not the actual name of the server on the list), then click "Create". Example:
It should, in the end, look something like this:

#### 2.4. Copying the key
Now copy the text in the “Key” field, in this example that is `3173a2e-6az0-4542-a3p0-ddqq5ff95558` and hold onto it for the next step. You can do this by clicking the clipboard on the right of the key:

### **3. Installation**
The BeamMP-Server is available for Windows and Linux. The next two sections are dedicated to Windows and Linux each.
#### 3.a. Installation on Windows
For the Linux installation, see the next step.
Please ensure you have port-forwarded before attempting to host a server at home! Without you ports being forwarded, you cannot host a server to the public!
1. Для запуска сервера убедитесь, что у вас установлены [Visual C++ Redistributables](https://aka.ms/vs/17/release/vc_redist.x64.exe).
2. Загрузите исполняемый файл сервера с [beammp.com](https://www.beammp.com/). У вас должен получиться исполняемый файл, который называется примерно так: `BeamMP-Server.exe`.
3. После загрузки создайте где-нибудь папку и поместите туда `BeamMP-Server.exe`. Это то место, где будет находиться ваш сервер.
4. Запустите сервер один раз, дважды щелкнув по нему. Это сгенерирует все необходимые файлы для вас, как только вы увидите текст, вы можете закрыть его и перейти к следующему шагу. Вы должны увидеть файл `ServerConfig.toml` рядом с вашим `BeamMP-Server.exe`.
5. (optional) For quick access in the future you can easily create a desktop shortcut to `BeamMP-Server.exe` using **[Right click]** > **Send to** > **Desktop (create shortcut).**
Теперь перейдите к шагу [4. Конфигурация](#4-configuration).
#### 3.b. Installation on Linux
##### Using our build (recommended)
This step will work on all distributions we provide binaries for [here](https://github.com/BeamMP/BeamMP-Server/releases/latest). If you're on a different distribution or architecture, refer to the "Building from source” step below.
1. Убедитесь, что у вас установлены зависимости, перечисленные [здесь](https://github.com/BeamMP/BeamMP-Server#runtime-dependencies).
2. Перейдите на сайт [beammp.com](https://beammp.com/) и нажмите кнопку «Загрузить сервер», вы будете перенаправлены на страницу релиза сервера на GitHub.
3. Загрузите правильную версию для вашего дистрибутива. Для простоты с этого момента она будет называться `BeamMP-Server-xxx`, где `xxx` обозначает версию для используемого вами дистрибутива.
4. После загрузки вы должны увидеть один файл с именем `BeamMP-Server-xxx`, среди прочих, которые вы можете пока проигнорировать. Создайте где-нибудь папку и поместите туда `BeamMP-Server-xxx`. Это то место, где будет находиться ваш сервер.
5. Откройте терминал, перейдите в папку, в которую вы поместили `BeamMP-Server-xxx`, и выполните `chmod +x BeamMP-Server-xxx`. Это гарантирует, что у вас есть разрешения на его запуск.
6. Запустите сервер один раз, запустив его с помощью `./BeamMP-Server-xxx`. Это сгенерирует все необходимые файлы для вас, как только вы увидите текст, вы можете закрыть его и перейти к следующему шагу. Вы должны увидеть файл `ServerConfig.toml` рядом с вашим `BeamMP-Server-xxx`.
7. (optional) It is heavily recommended to set up a user called `beammpserver` (or similar), as we do NOT recommend running the server as root, sudo or with your personal user account. You should then take steps to make sure that you start the server as this user only.
Now proceed to step "4. Configuration".
##### Building from source
Другие дистрибутивы в дополнение к тем, которые уже имеют [здесь](https://github.com/BeamMP/BeamMP-Server/releases/latest) двоичный файл, вероятно, тоже будут работать, но официально не поддерживаются. Если вы хотите собрать его самостоятельно, вы можете сделать это, загрузив исходный код на нашем [GitHub](https://github.com/BeamMP/BeamMP-Server), руководство можно найти [здесь](https://github.com/BeamMP/BeamMP-Server#build-instructions).
В конце обязательно запустите свой сервер один раз с помощью `./BeamMP-Server`, а затем переходите к следующему шагу.
### **4. Configuration**
Now that you ran the server once, it should have created some files and probably uttered an error or two. This is because we are not yet done. Your folder should have these files:
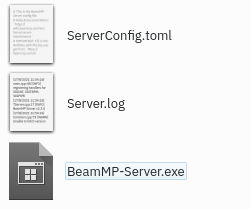
They are called “ServerConfig.toml”, “Server.log” and “BeamMP-Server.exe”! (Depending on your settings, you might not see the [.toml] [.log] [.exe] extentions)
Откройте `ServerConfig.toml` с помощью текстового редактора, например `Notepad`. Это можно сделать с помощью [Правый клик] → «Открыть с помощью…» и выбора текстового редактора.
Вот пример конфигурации:
```TOML
[General]
Port = 30814
AuthKey = "auth-key"
AllowGuests = false
LogChat = false
Debug = false
IP = "::"
Private = true
InformationPacket = true
Name = "Test Server"
Tags = "Freeroam,Modded,Racing,Police"
MaxCars = 2
MaxPlayers = 10
Map = "/levels/ks_nord/info.json"
Description = "Total Random Beam MP Server"
ResourceFolder = "Resources"
```
!!! info
```
This is your configuration file. It uses a format called TOML. Refer to the [Server Maintenance](server-maintenance.md) section for more info on this file and the variables.
Your server will **NOT** show in the server list as long as `Private = true`. _If_ you want it to show in the list, set that to **`Private = false`**.
```
For now, we only care about the `AuthKey` field. Between the quotes `''`, you want to paste in your AuthKey you copied in the first step.
For our example key, it should then look like this:
```TOML
AuthKey = '3173a2e-6az0-4542-a3p0-ddqq5ff95558'
```
Give your server a name, too, in the `Name` field. You can format this with colors and more, please refer to [this section on Name customization](server-maintenance.md#customize-the-look-of-your-server-name) in the server maintenance page.
Если вы выбрали другой **порт**, отличный от **30814**, обязательно замените его здесь в разделе `Port`.
### **5. Validation**
Теперь снова запустите сервер и посмотрите, выдает ли он еще сообщения `[ERROR]` или `[WARN]`. Теперь сервер должен оставаться открытым. В следующих шагах (6.) ниже вы можете узнать, как присоединиться к серверу.
---
#### 5.1 How to add mods to your server
Моды транспортных средств и моды карт устанавливаются по-разному, но оба требуют, чтобы вы поместили их в папку вашего сервера (`Resources/Client`). Просто перетащите любой мод, который вы хотите добавить, в эту папку.
!!! warning
```
Should you receive a "done" or "start" message when trying to join your server after adding mods, you likely added an incompatible or broken mod to your server.
Mod incompatibilities can also occur between 2 or more mods. If you have client mods installed, check [this guide](../../FAQ/How-to-deactivate-mods.md) about removing mods from your game.
```
#### 5.2 General Mods
If you only wanted to add modded vehicles, you simply put the zip file of the mod in the `Resources/Client` folder. They will automatically be downloaded by anyone who joins your server.
#### 5.3 Maps
Все стандартные карты (карты, которые не являются модами) работают сразу «из коробки» и не требуют установки. Вам нужно лишь изменить параметр `Map` в файле `ServerConfig.toml` на любое из [этих](server-maintenance.md#all-vanilla-maps-names). Для любых других, модифицированных карт, сделайте следующее:
1. Поместите `.zip`-файл вашей карты в папку вашего сервера (`Resources/Client`).
2. Далее, загляните в zip-файл карты (не извлекайте его) и откройте папку `levels`. В этой папке должна быть просто еще одна папка с названием карты, например, «myawesomedriftmap2021». Обязательно скопируйте или запомните это название *точно так, как оно написано в названии этой папки.*
3. Откройте `ServerConfig.toml`. В настройках `Map` вы должны увидеть `/levels/MAPNAME/info.json`, где `MAPNAME`, скорее всего, что-то вроде `gridmap_v2`. Теперь вам нужно заменить `MAPNAME` на имя папки из последнего шага, в том примере это было `myawesomedriftmap2021`. В итоге это должно выглядеть так (для этого примера) и ***должно*** иметь `/info.json` в конце.
```TOML
Map = '/levels/myawesomedriftmap2021/info.json'
```
Now, when someone joins your server, it should download the map automatically and work as expected.
**Если это НЕ работает**, установите карту в одиночную игру BeamNG.drive, запустите ее и войдите в карту. Затем откройте консоль, нажав клавишу `~` (*тильда*) (если у вас не американская раскладка клавиатуры, посмотрите на действие **Toggle System Console** в меню **Options > Controls > Bindings** в разделе **General Debug**), и запустите `print(getMissionFilename())`. Это должно показать вам имя для использования.
That's it! Your modded map should now be available to join!
### **6. How to join your server**
How you and other players can join your server.
#### 6.a. Joining your own server (both private and public)
If your server is hosted on the same PC as the game runs on, you must join your server by direct connecting, to do this, click the **Direct Connect Tab** on the left from the server list. Leave the default info in there (should be 127.0.0.1 and corresponding port) then hit connect.
If your server is hosted on another PC in your local network, you must find the local IP of that machine and direct connect using this local IP.
If your server is hosted outside of your house (e.g. VPS) you must find the [public IP](https://whatismyipaddress.com/) of that machine and direct connect that way.
#### 6.b. Other people joining your private server
You have to give other users the public IP Address of your Server. However, be careful sharing your public IP address with strangers! To join your private server the players must go to the **Direct Connect Tab** in BeamMP, then type your IP and Port.
#### 6.c. Other people joining your public server
Чтобы присоединиться к вашему публичному серверу, они могут просто перейти к списку серверов, ввести имя сервера и нажать «подключиться». Если вы не уверены в имени своего сервера, это будет имя, которое вы указали в `ServerConfig.toml`. Убедитесь, что фильтры поиска отключены, а Карта установлена на «Любая», если вы не можете ее найти. Вы также можете проверить веб-сайт [Keymaster](https://beammp.com/keymaster) на предмет IP-адреса сервера.
Если вы или ваши друзья столкнулись с ошибкой «Сбой подключения!», проверьте окно запуска на наличие кодов вроде 10060, 10061, 10030. Это означает, что у вас либо есть CGNAT IPv4, либо вы сделали что-то неправильно на шаге **1 Переадресация портов** или **1.1. Межсетевой экран**. Чтобы проверить, есть ли у вас CGNAT IPv4, найдите WAN IP-адрес на интерфейсе маршрутизатора. Сравните его с вашим [публичным IP-адресом](https://www.whatsmyip.org/). Если они одинаковы, вы не находитесь за CGNAT. Поддержка IPv6 пока **НЕ** реализована.
### **7. Как проверить подключение вашего сервера BeamMP**
Введите публичный IPv4-адрес и порт сервера ниже, затем нажмите «CheckBeamMP».
!!! warning "I want to use a VPN such as RadminVPN, Hamachi, or similar."
```
BeamMP не поддерживает эти VPN, так как они часто вызывают проблемы. Одна из этих проблем — непереадресация трафика UDP. Чтобы решить эту проблему, обратитесь к разделу 1.
!!! вопрос «Но почему это работало в прошлом?»
Это происходит из-за того, что разработчики этих приложений обновляют свое программное обеспечение и вносят изменения, которые BeamMP не контролирует.
Разработчики этих приложений должны обеспечить поддержку конкретных вариантов использования, таких как BeamMP-Server.
```
## Still facing issues?
Откройте тему на [форуме](https://forum.beammp.com) или на нашем [сервере Discord](https://discord.gg/beammp) в канале `#support`.